Databricks Integration
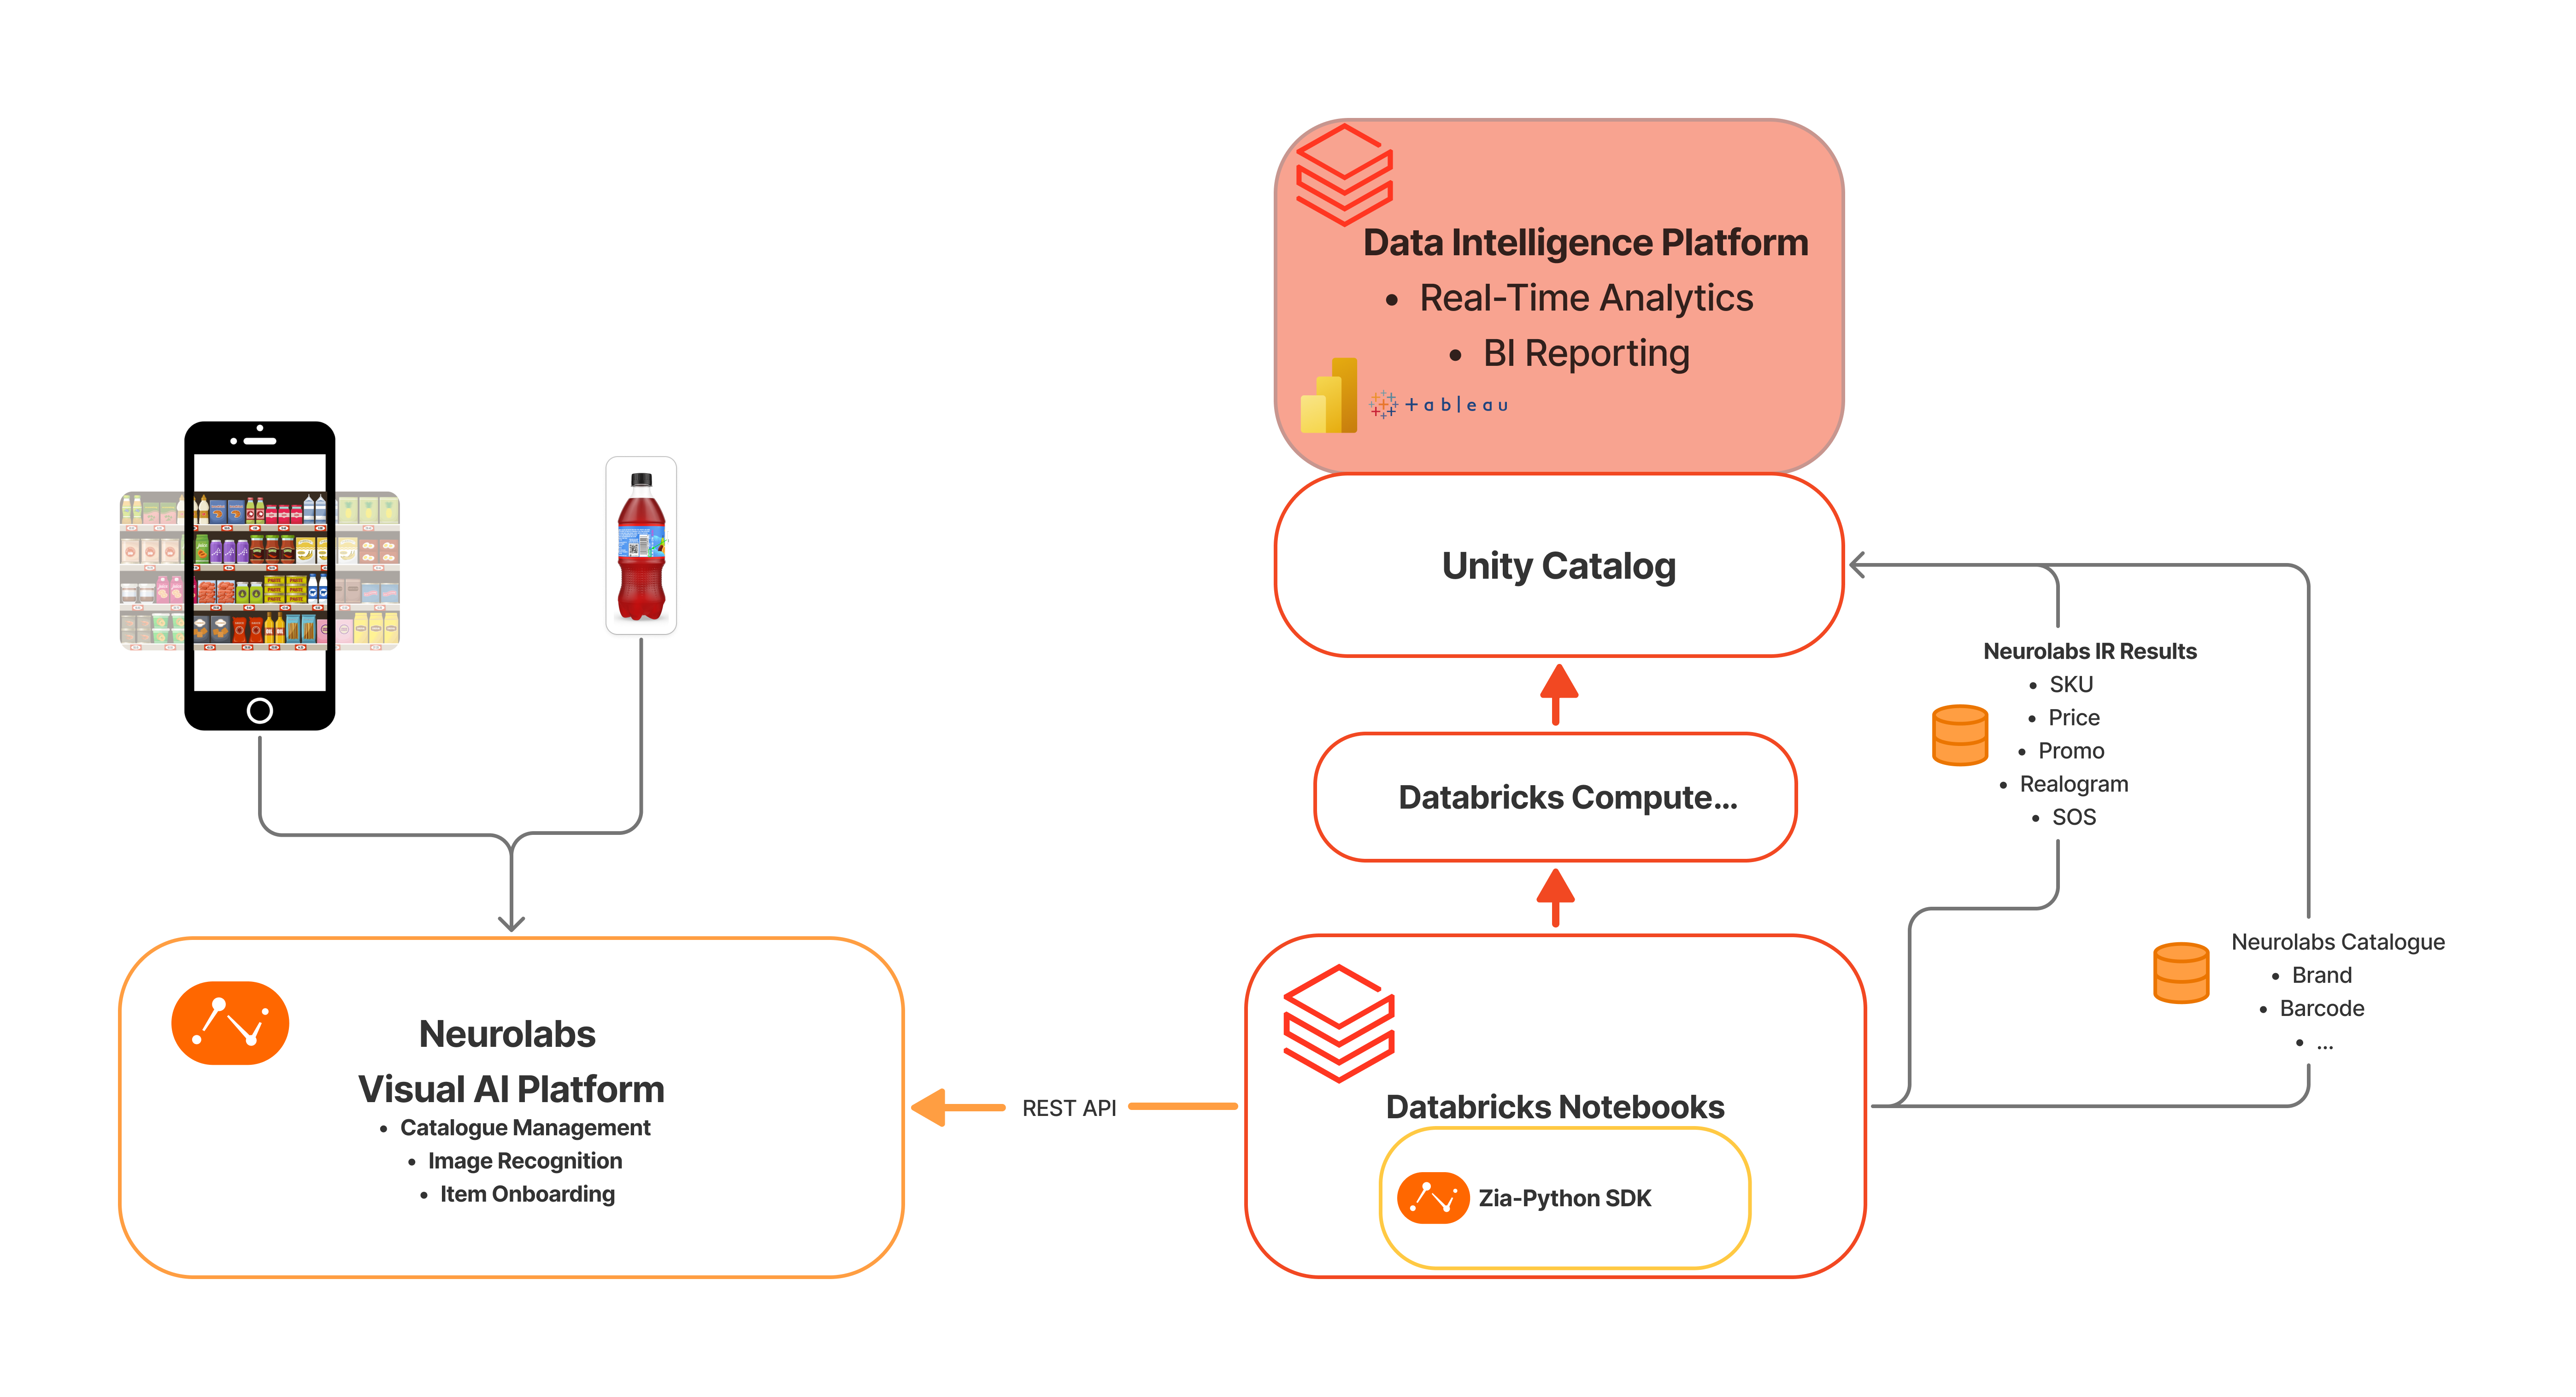
Neurolabs enables Databricks access to the Item Catalog and Image Recognition results for CPGs and ecosystem partners, bringing the Visual AI Layer inside the Lakehouse [1].
This guide covers how to use the Neurolabs ZIA Python SDK to store and manage image recognition results and catalog data with Databricks Notebooks & Unity Catalog. It includes a quickstart, sample code snippets for data processing, Unity Catalog integration and an end to end working example.
If you'd like to learn more about the reports & dashboards Neurolabs Visual AI data enables, and how to create these using Databricks native visualisation tools, please reach out.
Quick Start
Overview of Neurolabs Databricks Integration Workflows
For a complete end to end workflow, clone the Neurolabs Blueprint notebook for populating Unity Catalog with IR Results: IR Results Neurolabs Ingestion [DB Integration].ipynb
High-Level Steps
- Prerequisites - Prerequisites for setting up the integration
- Setup Client Configuration - Initialize the ZIA client and configure authentication
- Get IR Results - Fetch image recognition results or catalog data from Neurolabs
- Setup Unity Catalog - Prepare Unity Catalog structure
- Populate Unity Catalog - Convert and write results to Unity Catalog tables
Table of Contents
- Prerequisites
- Installation
- Setup Client
- Get IR Results
- Setup Unity Catalog
- Populate Unity Catalog
- Advanced Examples
- Troubleshooting
Prerequisites
- Setup Databricks workspace with Unity Catalog enabled.
- Python 3.11+ runtime
- Get access to Neurolabs Zia Platform and create an API key
- Unity Catalog permissions for creating/updating tables
[Optional]
brew tap databricks/tap
brew install databricks
We recommend configuring Databricks Secrets with Neurolabs API Key at Workspace Level.
databricks auth login --host <your_hostname>

databricks secrets create-scope <scope-name>
databricks secrets put-secret --json '{
  "scope": "<scope-name>",
  "key": "<key-name>",
  "string_value": "<secret>"
}'
For production jobs, it is recommended setup a principal service account.
Installation
Install ZIA Neurolabs SDK in Databricks
In your Databricks Notebook, install the ZIA SDK with PySpark & Pandas extras enabled. To find out out more about the ZIA SDK, check the PYPI Project.
# Install ZIA SDK
!pip install zia-sdk-python[databricks]

# Restart Python to ensure the package is available
dbutils.library.restartPython()
Configure Neurolabs Secrets
Set up your Neurolabs API credentials with databricks secrets or using environment variables:
import os

# Option A:
os.environ["NEUROLABS_API_KEY"] = "your-api-key-here"

# Option B
try:
    api_key = dbutils.secrets.get(scope="neurolabs-api", key="demo-key")
except Exception as e:
    raise RuntimeError("Failed to retrieve API key from Databricks secrets. Make sure the secret scope and key are set up.") from e
1. Setup Client
Initialize ZIA Client
# Import zia-sdk depdendencies
from neurolabszia import Zia

# Initialize the client
client = Zia(api-key)

# Test the connection
try:
    # Get catalog items to verify connection
    catalog_items = await client.catalog.get_all_items()
    print(f"Successfully connected! Found {len(catalog_items)} catalog items")
except Exception as e:
    print(f"Connection failed: {e}")
2. Get IR Results
Fetch Image Recognition Results
Using the account provided by Neurolabs and with access to a Task UUID, you can now retrieve some image recognition results. The SDK supports both the NLIRResult data model, and raw JSON results.
# Fetch some results from a specific task
task_uuid = "your-task-uuid"
batch_size = 10
offset = 0

results = await client.result_management.get_task_results(
    task_uuid=task_uuid,
    limit=batch_size,
    offset=offset
    )

 # Optional: Parse Raw JSON Response
results_json = await client.result_management.get_task_results_raw(
    task_uuid=task_uuid,
    limit=batch_size,
    offset=offset
    )


print(f"Retrieved {len(results)} results from task {task_uuid}")
[Optional] Convert IR Results to Pandas DataFrame
from neurolabszia.utils import ir_results_to_dataframe

# Convert results to pandas DataFrame
df = ir_results_to_dataframe(
    results,
    include_bbox=True,
    include_alternative_predictions=True,
    include_modalities=True,  # Include realogram data
    include_shares=True       # Include share of shelf data
)

print(f"DataFrame shape: {df.shape}")
print(f"Columns: {df.columns.tolist()}")

# Display sample data
display(df.head())
Convert IR Results to Spark DataFrame
In order to populate the resuls into Unity Catalog, the first step is to convert the IR Results into a Spark dataframe.
from neurolabszia import Zia, NLIRResult
from neurolabszia.utils import to_spark_dataframe

# Create Spark Session
spark = SparkSession.builder.appName("NLIRResultsIngestion").getOrCreate()

# Convert to Spark DataFrame
spark_df = to_spark_dataframe(
    results,
    spark,
    include_bbox=True,
    include_alternative_predictions=True,
    include_modalities=True,
    include_shares=True
)

print(f"Spark DataFrame count: {spark_df.count()}")
display(spark_df.limit(10))
3. Setup Unity Catalog
Create Unity Catalog Structure
Before populating with data, ensure your Unity Catalog structure is set up:
# Create catalog and schema if they don't exist
catalog_name = "neurolabs"
schema_name = "image_recognition"

# Note: In production, these should be created by your Unity Catalog admin
print(f"Ensure Unity Catalog structure exists: {catalog_name}.{schema_name}")

spark.sql(f"CREATE SCHEMA IF NOT EXISTS {catalog_name}.{schema_name}")
4. Populate Unity Catalog
Populate Unity Catalog Table from IR Results
from neurolabszia.utils import to_spark_dataframe

# Convert results to Spark DataFrame
spark_df = to_spark_dataframe(
    results,
    spark,
    include_bbox=True,
    include_alternative_predictions=True,
    include_modalities=True,
    include_shares=True
)

# Create the full table path
table_path = f"{catalog_name}.{schema_name}.{table_name}"

# Write to Unity Catalog

spark_df.write.format("delta").mode(mode).saveAsTable(table_path)

print(f"Successfully created/updated table: {table_path}")
print(f"Row count: {spark_df.count()}")
Populate Unity Catalog Table from Catalog Items
def create_neurolabs_catalog_table(
    catalog_name: str,
    schema_name: str,
    table_name: str,
    mode: str = "overwrite"
):
    """
    Create a Unity Catalog table from catalog items.
    """
    # Fetch all catalog items
    catalog_items = await client.catalog.get_all_items()

    # Convert to Spark DataFrame
    catalog_df = spark.createDataFrame([
        {
            "uuid": item.uuid,
            "name": item.name,
            "status": item.status.value,
            "thumbnail_url": item.thumbnail_url,
            "brand": item.brand,
            "barcode": item.barcode,
            "custom_id": item.custom_id,
            "height": item.height,
            "width": item.width,
            "depth": item.depth,
            "size": item.size,
            "container_type": item.container_type,
            "flavour": item.flavour,
            "packaging_size": item.packaging_size,
            "created_at": item.created_at,
            "updated_at": item.updated_at
        }
        for item in catalog_items
    ])

    # Create the full table path
    table_path = f"{catalog_name}.{schema_name}.{table_name}"

    # Write to Unity Catalog
    catalog_df.write.format("delta").mode(mode).saveAsTable(table_path)

    print(f"Successfully created/updated catalog table: {table_path}")
    print(f"Catalog items count: {catalog_df.count()}")

    return table_path

# Example usage
catalog_table_path = create_neurolabs_catalog_table(
    catalog_name="neurolabs",
    schema_name="catalog",
    table_name="products",
    mode="overwrite"
)
Advanced Examples
1. Batch Processing Multiple Tasks
Coming soon ..
2. Data Quality Checks
Coming soon ..
3. Analytics and Insights
Coming soon ..
Troubleshooting
Common Issues
-
Authentication Errors
-
Schema Mismatches
-
Unity Catalog Permissions
# Test table creation permissions
try:
    test_df = spark.createDataFrame([{"test": "data"}])
    test_df.write.format('delta').mode("overwrite").saveAsTable("test_table")
    print("Unity Catalog permissions OK")
except Exception as e:
    print(f"Unity Catalog permission error: {e}")
Performance Optimization
- Use appropriate cluster size for your data volume
- Enable autoscaling for variable workloads
- Cache frequently accessed DataFrames
Support
For issues specific to the ZIA SDK, check the main Zia SDK README.md file or contact the development team at support@neurolabs.ai.
For Databricks-specific issues, refer to the Databricks documentation.